
When you are running an online shopping website & getting sales from it, it is very important to track the sales you get from your online store.
Google Analytics is so powerful that help measure data from various dimensions, Enhanced eCommerce Tracking is one of them.
What is Enhanced eCommerce Tracking?
Enhanced eCommerce Tracking is a Google Analytics feature that helps online store owners to keep on track of their sales, transections, returns & users shopping behaviour.
This is a very useful feature of Google Analytics & users are taking benefits from this from a while.
Setting up Enhanced eCommerce Tracking on any online shopping website may require some development knowledge based on the CMS you use.
In this blog, we will learn about how we can set up Enhanced Ecommerce Tracking to WooCommerce using Google Tag Manager.
Step 1: Enable Enhanced eCommerce Tracking setting in Google Analytics
Before we start this, make sure you have enabled the enhanced eCommerce tracking to your Google Analytics so that you can able to see the eCommerce data in conversions tab.
To enable this, Go to Google Analytics > Admin > Ecommerce Settings
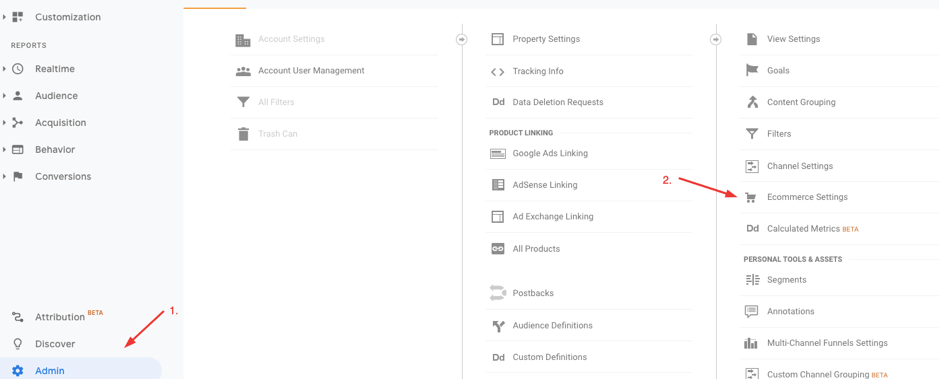
Once you get there, switch ON Enable Ecommerce & Enable Enhanced Ecommerce Reporting & click SAVE.

Step 2: Add a JavaScript to Thank You page
The process of the enhanced eCommerce tracking is that a JavaScript is inserted in the datalayer on the thankyou page so that it will pass the information like product info, price, quantity etc. to the Google Analytics using Google Tag Manager.
Here is the script which needs to be added to the functions.php in your WordPress.
Here are the steps:
- Login to your WordPress
- 2. Go to Appearance > Theme Editor > functions.php
Copy the below mentioned JavaScript & page it to functions.php file:
function push_to_datalayer($order_id) {

    $order = wc_get_order( $order_id );
    ?>
    <script type='text/javascript'>
        window.dataLayer = window.dataLayer || [];
                 dataLayer.push({
                     'event' : 'transaction',
                     'ecommerce' : {
                         'purchase' : {
                             'actionField' : {
                                 'id': '<?php echo $order->get_order_number(); ?>',
                                 'affiliation': '<?php echo get_option("blogname"); ?>',
                                 'revenue' : '<?php echo number_format($order->get_subtotal(), 2, ".", ""); ?>',
                                 'tax': '<?php echo number_format($order->get_total_tax(), 2 ,".", ""); ?>',
                                 'shipping': '<?php echo number_format($order->calculate_shipping(), 2 , ".", ""); ?>',
                                 <?php if($order->get_used_coupons()) : ?>
                                  'coupon' : '<?php echo implode("-", $order->get_used_coupons()); ?>'
                                 <?php endif; ?>
                             },
                                 'products': [
                                        <?php
                                         foreach ( $order->get_items() as $key => $item ) :
                                            $product = $order->get_product_from_item($item);
                                            $variant_name = ($item['variation_id']) ? wc_get_product($item['variation_id']) : '';
                                        ?>
                                    {
                                        'name' : '<?php echo $item['name']; ?>',
                                        'id' : '<?php echo $item['product_id']; ?>',
                                        'price' : '<?php echo number_format($order->get_line_subtotal($item), 2, ".", ""); ?>',
                                        'brand' : '',
                                        'category' : '<?php echo strip_tags($product->get_categories(', ', '', '')); ?>',
                                        'variant' : '<?php echo ($variant_name) ? implode("-" , $variant_name->get_variation_attributes()) : ''; ?>',
                                        'quantity' : <?php echo $item['qty']; ?>,
                                        'coupon' : ''
                                    },
                                <?php endforeach; ?>
                                 ]
                             }

                         }
                     });
        </script>

    <?php
}

add_action('woocommerce_thankyou' , 'push_to_datalayer');
Above JavaScript will help pass the order information & this will be fired on ThankYou page of the website.
Step 3: Create a trigger
Now once we create the tag, we need to create a trigger which will listen to the event which will fire at the time of successful order placement on Thank You page.
Since we have already added the event name as ‘transaction‘, so we will create the trigger by the same name.
You can change the event name as per your requirement but as I’ve already created that JavaScript with the event name, so I advise you do not change any setting in there.
To create the trigger, follow these steps:
- Go to Google Tag Manager
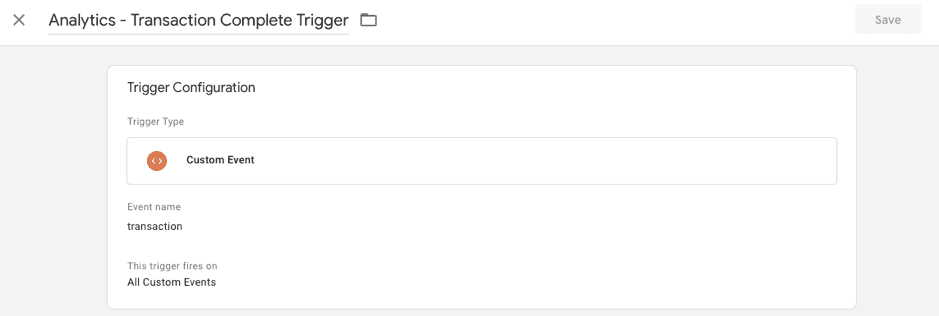
- Go to Trigger > New Trigger & name it as per your requirement (I’ve named mine as Analytics – Transaction Complete Trigger)
- Choose Trigger Type > Custom Event
- Event Name > transaction (as we have named the event as the transaction in JavaScript which we already placed on functions.php file)
- This trigger fires on > All Custom Events
- Save this trigger
Step 4: Create a Tag in Google Tag Manager
Now, once we enable the eCommerce setting in Google Tag manager, we need to create the tag which helps to interact between Google analytics & the trigger which we will create in the next step.
To create this tag, follow the steps below:
- Login to Google Tag Manager
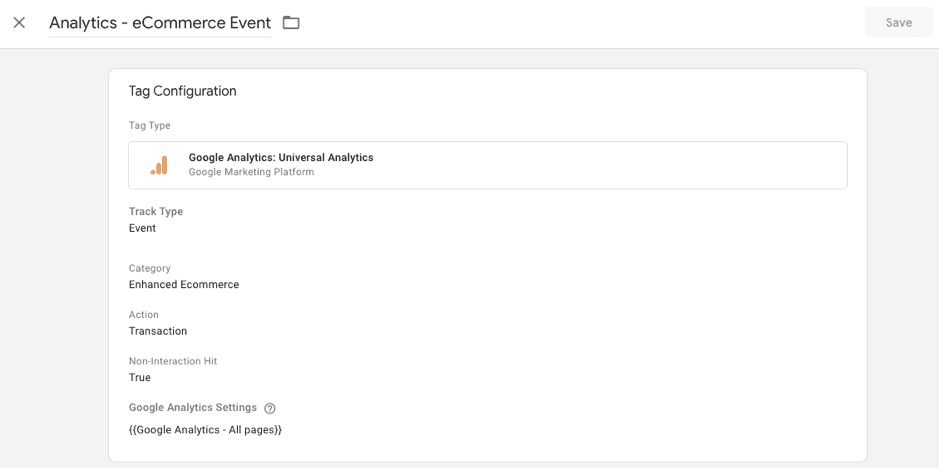
- Go to New Tag > Name it as you want (I’ve named mine Analytics – eCommerce Event)
- Tag Type > Google Analytics: Universal Analytics
- Track Type > Event
- In Event Tracking Parameters, Choose Category (Choose category name)
- Action > (Choose category name)
- Non-Interaction Hit > True
- Google Analytics Settings > (Choose from the Google Analytics Variable)
TIP: Never override the Google Analytics tag. Always use create & use Google Analytics Variable as this will add some require features to the tag.
Now since we have created the tag, this needs to be fired on the trigger which we created in the last step.
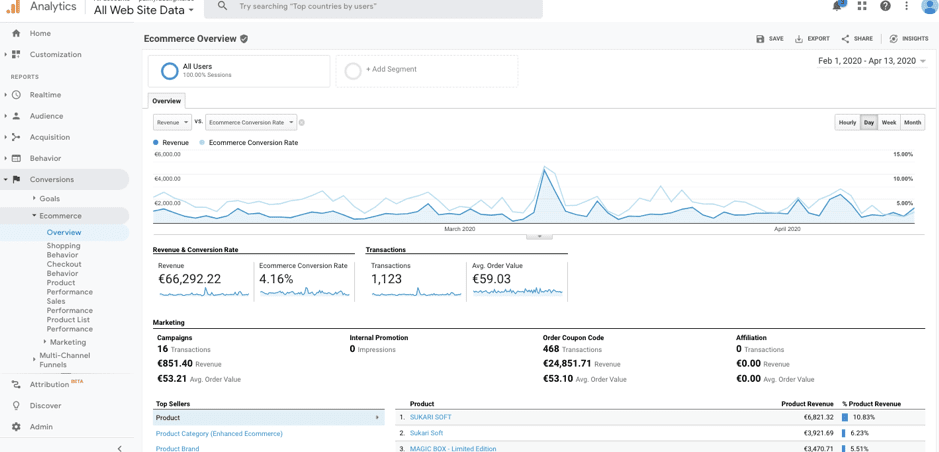
Once done, you can publish all the changes & move that to tests. Once you start getting more sales, you will see the data in Google Analytics > Conversions > Ecommerce > Overview.
Setting up Google Analytics 4 for WooCommerce
A. Creating a Google Analytics 4 Property
- Log in to your Google Analytics account or create a new one if you don’t have an account already.
- Navigate to the Admin section and select “Create Property.”
- Choose the “Web” option and enter your website’s URL.
- Follow the prompts to complete the property creation process and obtain your GA4 tracking code snippet.
B. Installing GA4 Tracking Code on WooCommerce
- Access your WordPress dashboard and navigate to the “Appearance” > “Theme Editor” section.
- Locate the header.php file in your theme and paste the GA4 tracking code snippet just before the closing </head> tag.
- Save the changes, and the GA4 tracking code will now be installed on your WooCommerce website.
C. Verifying GA4 Installation
- Visit your website and right-click to view the page source.
- Search for your GA4 tracking code snippet to ensure it’s present in the header section of your website’s HTML code.
- Alternatively, use the Google Tag Assistant Chrome extension to verify the installation.
D. Testing GA4 Tracking
- Perform test transactions on your WooCommerce website, including product views, adding items to the cart, and completing purchases.
- Access your Google Analytics 4 dashboard and navigate to the Real-time reports section to verify that the test events are being tracked correctly.
III. Implementing Enhanced Ecommerce Tracking
A. Enabling Enhanced Ecommerce Features in GA4
- Access your Google Analytics 4 property settings and navigate to the “Data Streams” section.
- Select your web data stream and click on “Enhanced Measurement.”
- Toggle on the “Enhanced Ecommerce” option to enable enhanced ecommerce tracking features for your WooCommerce website.
B. Configuring Enhanced Ecommerce Settings
- Customize your enhanced ecommerce settings according to your business requirements, including product detail collection, checkout options, and promotional clicks.
- Define your currency code, enable product refunds tracking, and configure other advanced settings as needed.
C. Adding Additional Enhanced Ecommerce Parameters
- Utilize the GA4 Measurement Protocol or Google Tag Manager to send additional ecommerce-related parameters, such as product categories, brands, and custom dimensions.
- Implement event tracking for enhanced ecommerce actions, such as product impressions, clicks, and promotions.
D. Testing Enhanced Ecommerce Tracking
- Conduct thorough testing of enhanced ecommerce tracking by simulating various user interactions and ecommerce events on your WooCommerce website.
- Use the GA4 DebugView feature to troubleshoot and validate the data being sent to Google Analytics 4 in real-time.
IV. Analyzing Enhanced Ecommerce Data in GA4
A. Exploring Enhanced Ecommerce Reports
- Navigate to the “Analysis” > “Reports” section in your Google Analytics 4 dashboard.
- Explore the enhanced ecommerce reports, including the Shopping Behavior analysis, Checkout Behavior analysis, and Product Performance analysis.
B. Gaining Insights into Customer Behavior
- Use the enhanced ecommerce reports to gain insights into your customers’ behavior throughout the entire purchase funnel.
- Identify drop-off points, optimize product listings, and refine your marketing strategies based on the data insights provided by GA4.
C. Leveraging Custom Reports and Dashboards
- Create custom reports and dashboards in Google Analytics 4 to track specific ecommerce metrics and key performance indicators (KPIs) relevant to your business goals.
- Utilize data visualization tools to present ecommerce data in a visually appealing and easy-to-understand format.
D. Integrating GA4 with Other Tools
- Explore integration options to connect Google Analytics 4 with other analytics platforms, CRM systems, and marketing automation tools.
- Leverage data integration to unlock additional insights and streamline your ecommerce analytics workflow.
V. Optimizing Ecommerce Performance with GA4 Insights
A. Implementing Data-Driven Strategies
- Use the insights gathered from GA4 enhanced ecommerce tracking to optimize your product assortment, pricing strategies, and marketing campaigns.
- Implement data-driven strategies to enhance the overall ecommerce performance and maximize revenue potential.
B. Personalizing the Customer Experience
- Leverage GA4 audience insights to create personalized shopping experiences for your customers, such as targeted product recommendations and customized promotions.
- Use segmentation and remarketing techniques to re-engage users based on their previous interactions with your WooCommerce website.
C. Improving Conversion Rate Optimization (CRO)
- Identify conversion bottlenecks and friction points within the ecommerce funnel using GA4 data.
- Implement conversion rate optimization (CRO) techniques, such as A/B testing and website optimization, to improve the conversion rate and drive more sales.
D. Measuring ROI and Attribution
- Use GA4 attribution reports to measure the ROI of your marketing channels and campaigns accurately.
- Attribute conversions and sales to the respective marketing touchpoints across the customer journey, enabling data-driven decision-making and budget allocation.
VI. Troubleshooting Common Issues and Challenges
A. Addressing Data Discrepancies
- Investigate and resolve any discrepancies between GA4 enhanced ecommerce data and your actual sales records.
- Ensure that ecommerce events are being tracked correctly and that there are no issues with data integrity or data sampling.
B. Debugging Tracking Code Implementation
- Use debugging tools like Google Tag Assistant and GA4 DebugView to troubleshoot tracking code implementation issues.
- Verify that the GA4 tracking code is installed correctly on all pages of your WooCommerce website and that it’s capturing the desired ecommerce events.
C. Resolving Configuration Errors
- Double-check your enhanced ecommerce settings in Google Analytics 4 to ensure they align with your ecommerce setup and business objectives.
- Correct any configuration errors or inconsistencies that may impact the accuracy of your ecommerce tracking data.
D. Seeking Support from Google Analytics Community
- Join online forums, communities, and support groups dedicated to Google Analytics and ecommerce tracking.
- Seek advice and assistance from experienced professionals and industry experts to resolve complex issues and challenges related to GA4 implementation.
If you navigate to some other tabs such as shopping behaviour, checkout behaviour, product performance, you will see some more data there.
By setting up enhanced eCommerce tracking, you can easily see which is your best product for sale, what is customer & product behaviour & performance etc.
Once you have this data, you can optimize your online store further.
If you think we have missed any important setup or you know any other way to set up enhanced eCommerce tracking to the WooCommerece, then let us know in comments.
If you need any assistance on your SEO campaign, you can hire us by getting a 14 Days Free SEO Trial.
Need any help or assistance in Google Analytics?
We provide SEO & Google Analytics Consulting services in the following countries:
United States | United Kingdom | Australia | Singapore | India | New Zealand | Dubai
Related Articles
How To Setup Facebook Pixel & Events (With Google Tag Manager)
How to Setup Google Ads Conversion Tracking in BigCommerce (With Order Amount & Order ID)
How to Setup Ninja Forms Event Tracking with Google Tag Manager
The Use of Artificial Intelligence (AI) in SEO – All You Need To Know
How to Setup Contact Form 7 Event Tracking with Google Tag Manager
Best Website Traffic Monitoring Tools
How To Create Custom Reports In Google Analytics
